Fix
How to get bubbles out of epoxy and UV resin
Published Updated
As an Amazon Associate we earn from qualifying purchases. This does not change our picks. Affiliate disclosure
New to Prime? Try Prime free for fast, free shipping on eligible items.
Short answer
Pop surface bubbles in wet epoxy with a quick pass of a heat gun or torch and lift single ones with a toothpick. Rest UV resin 5 to 10 minutes and clear bubbles before the lamp. Bubbles inside a cured piece cannot be removed, so prevent them: warm bottles, a slow 3 to 5 minute stir, or a pressure pot at 40 to 60 psi.
Gear for this job
All 6 picks comparedLET'S RESIN 350W dual temp heat gun for resin
See price on AmazonSee it on AmazonResiners 350W mini heat gun for resin bubbles
See price on AmazonSee it on AmazonYEEGEWIN 380W mini heat gun, 480 F and 850 F
See price on AmazonSee it on Amazon
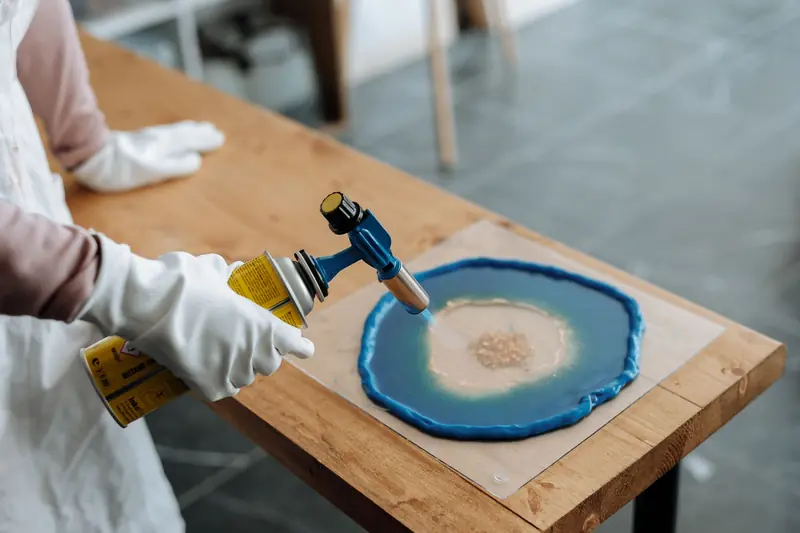
Bubbles get into resin in four ways: air stirred in while mixing, cold resin that is too thick to let air escape, air carried in by the mold or an inclusion, and heat from a pour that is too deep. Each has its own fix, and most only work while the resin is still liquid. This page starts with what you can do right now, then goes through the job in order: before mixing, mixing, after pouring, and the equipment that deals with bubbles for good. Epoxy and UV resin are covered separately where they differ.
Where are the bubbles? Cause and fix
Find the row that matches what you see. The first four can still be fixed while the resin is liquid. Once epoxy has gelled or UV resin has been under the lamp, bubbles inside the piece are permanent, and only surface bubbles can be sanded out and recoated.
| What you see | Likely cause | What to do |
|---|---|---|
| Bubbles on the surface just after pouring | Air stirred in during mixing, now rising | Epoxy: quick pass of a heat gun or torch. Single bubbles: toothpick |
| Bubbles in UV resin before curing | Thick resin squeezed or stirred fast | Rest 5 to 10 minutes, move bubbles out with a toothpick, then cure |
| Bubbles in corners and fine detail | Air trapped against the mold as resin flowed in | Pour slowly in a thin stream, tease corners with a toothpick |
| Bubbles around a flower, paper or wood | Air or moisture held by the inclusion | Dry inclusions fully, pour a thin first layer, release bubbles with a toothpick |
| Milky haze of tiny bubbles | Cold resin: micro bubbles too small to torch out | Next time warm closed bottles 10 to 15 minutes in warm water |
| Bubbles deep in a cured casting | Thick resin set before the air could rise | Not fixable after cure. Next time use a thin casting resin or a pressure pot |
| Bubbles with heat, cracks or yellowing | Poured deeper than the label allows | Pour in layers at the depth on the label |
Before mixing: warm cold resin
Cold resin is thick, and thick resin holds air. ArtResin describes cold resin as cloudy with thousands of micro bubbles that are too small to torch out, so this is the one bubble problem that heat on the surface cannot fix. Makers ask for a room of about 70 to 80 F. ArtResin asks for 75 to 85 F and reports trouble below 72 F.
If the bottles feel cold, stand them with caps closed in warm, not hot, water for 10 to 15 minutes before measuring. Dry the bottles before opening so no water gets into the resin. Warm resin reacts faster: ArtResin says working time drops by about 10 minutes. Warm the two parts before mixing, never the mixed cup. More on haze in why resin turns cloudy.
How to mix epoxy resin without bubbles
Most surface bubbles are made by the stir stick. Stir slowly for 3 to 5 minutes, scraping the sides and bottom of the cup. ArtResin warns that vigorous stirring whips in air and gives a frothy mix with far more bubbles than necessary. Do not cut the time short to avoid bubbles: under-mixed resin stays sticky, and that is worse than bubbles you can pop.
- Keep the stick low in the cup and move it steadily. Do not lift it in and out of the resin or beat the mix.
- Let the mixed cup rest briefly so bubbles rise, but watch the working time on the label. A large mass of epoxy heats up in the cup and sets faster.
- Pour slowly in a thin stream from low over the mold, into one spot, and let the resin spread into corners on its own.
- Use a thin casting resin for molds. Coating resins are thick and made for layers of about 1/8 inch: see casting resin vs coating resin.
After pouring: heat gun, torch or toothpick
Bubbles rise to the surface in the first minutes after a pour, and a touch of heat pops them. ArtResin calls a flame torch the easiest way to remove bubbles from epoxy and says a heat gun also works but is less precise. Either way use light, quick passes and keep the tool moving. Do not hover in one place, and take extra care over silicone: Let's Resin warns that a flame can burn or damage a mold.
Check the piece again a few times while the resin is still liquid, since new bubbles keep rising from the bottom and from inclusions. A toothpick is the precise tool: drag a bubble to the edge or lift it out. Stop once the resin starts to thicken. The heat gun guide compares tools for this step.
Note.Heat tools are for bubbles on the surface. They do not pull out micro bubbles from cold resin or bubbles deep in a thick casting.
How to fix bubbles in UV resin
UV resin is thick and comes out of a squeeze bottle, so it traps air easily. The fix has to happen before the lamp goes on. Resin Rockers says to let the resin rest at least 5 to 10 minutes so bubbles surface, then move them aside with a toothpick. Art Clay World adds that warming a thick UV resin slightly makes it thinner and can reduce bubbles. Keep the piece away from sunlight while it rests.
Sources differ on open flame. Let's Resin says to use a heat gun for surface bubbles and to avoid a lighter or torch. Resin Rockers and Art Clay World both describe passing a lighter flame over the surface, and Resin Rockers adds not to hold it to the resin because resin can burn. Follow the instructions for your own resin.
If UV resin bubbles under the lamp, look at lamp power first. Resin Rockers notes that higher wattage risks over-curing and bubbles, and Let's Resin advises not going over 54 W. Keep layers to about 2 to 3 mm. A bubble at the surface of a cured piece can be sanded flat and covered with a thin clear coat.
Pressure pot or vacuum chamber: which removes bubbles?
A pressure pot does not take air out. It squeezes bubbles until they are too small to see while the resin cures around them. Makers give 40 to 60 psi, and Smooth-On specifies 60 psi held until the resin gels. Casting pots are commonly rated for 60 psi working pressure with an 80 psi relief valve. Use only a pot rated for the pressure, never go above its rating and never use a homemade vessel. Smooth-On also warns that a rubber mold must itself be made under pressure, or its own bubbles collapse and show as dimples on the casting.
A vacuum chamber works before the pour: it pulls air out of the mixed resin or silicone. Smooth-On says the pump must pull 29 inches of mercury. The material rises to 4 to 5 times its volume while it degasses, so the cup needs that much headroom. Some epoxies must not be vacuumed at all, and Smooth-On says this of EpoxAcast 690. The vacuum chamber guide compares chambers. No pot or chamber? See resin casting without a pressure pot.
Bubbles from pouring too deep
Epoxy makes heat as it cures, and a pour deeper than the resin is rated for cannot shed it. The result is bubbles that form late, sometimes with cracks or yellowing. Typical limits per layer are about 1/8 inch for coating epoxy, up to 3/8 inch for casting epoxy and 1 to 2 inches for deep pour, with the label deciding. Deeper molds are filled in layers. The resin calculator works out how many layers a mold needs for each resin type.
When bubbles make resin look cloudy
Sometimes the problem is not a few visible bubbles but a milky look across the whole mix. Cold resin is thick, so thousands of micro bubbles stay trapped in it and the liquid looks hazy in the cup. Warming the closed bottles in warm water for 10 to 15 minutes, working in a room around 70 to 80 F, and stirring slowly for 3 to 5 minutes are the usual first steps, along with the heat gun pass described above. Always follow the temperature range in your resin's instructions.
Cloudiness can also come from other causes, such as a matte mold surface, moisture or amine blush from humid air, and those need a different fix. If your resin looks hazy rather than bubbly, or the haze showed up after curing, see why epoxy resin turns cloudy and how to fix it to match what you see with the likely cause.
Quick answers
Short answers on resin bubbles. Pressure, times and temperatures are maker figures, and the instructions for your own resin and equipment come first.
- How to get bubbles out of epoxy? Pass a heat gun or torch quickly over the wet surface and lift stragglers with a toothpick. Recheck while the resin is still liquid.
- How to mix epoxy resin without bubbles? Warm cold bottles first, then stir slowly for 3 to 5 minutes with the stick kept low in the cup.
- How to fix bubbles in UV resin? Rest it 5 to 10 minutes before curing and move bubbles out with a toothpick. Makers disagree on using a flame.
- Why is my UV resin bubbling? Usually air from fast squeezing or stirring. Under the lamp, Resin Rockers links bubbles to too much wattage.
- How to fix air bubbles in epoxy resin that has cured? Not possible inside the piece. Surface bubbles can be sanded flat and covered with a thin clear coat.
What you need for this
- See price on AmazonAmazon
LET'S RESIN 350W dual temp heat gun for resin
From Best heat gun for resin art: popping bubbles without damage
- See price on AmazonAmazon
California Air Tools 255C casting pot, 2.5 gal
From Best pressure pot for resin casting: sizes, PSI and setup
- See price on AmazonAmazon
VEVOR 3 Gallon Vacuum Chamber with Pump
- See price on AmazonAmazon
LET'S RESIN casting resin kit, 34 oz
From Best epoxy resin for silicone molds: clear casting picks